-
 Edited by Tanasit Auewongaree
การใช้งานส่วนเสริมออกรายงาน
การใช้งานส่วนเสริมออกรายงาน เราจะใช้วิธีการ Inject IExportExcelService (ต่อไปจะเรียกว่า Service) ไปยังคลาส Interface Controller หรือ Interface Service ที่ต้องการใช้งาน คำสั่งออกเอกสาร โดย Service จะมีคำสั่งสร้างอินสแตนซ์ IExportExcelProvider (ต่อไปจะเรียกว่า Provider) เพื่อใช้งานคำสั่งสำหรับออกรายงานเอกซ์เซล
ตัวอย่าง : excelHelper
var _excel = _exportExcelService.excelHelper(_unitOfWork, param);คำอธิบาย
จากรหัสคำสั่ง ตัวแปร _excel คือ อินสแตนซ์ของ Provider หรือ สามารถเรียกว่า Object ของ Provider class ได้เหมือนกัน ซึ่งการจะสร้างอินสแตนซ์ Provider สิ่งจำเป็นที่ขาดไม่ได้เลยคือ IUnitOfWork class หรือ อินสแตนซ์ที่สร้างมาจากคลาสดังกล่าว ที่เราบรรจุใส่ในพารามิเตอร์ที่ 1 เป็นสิ่งที่ต้องการ และขาดไม่ได้ (Required) ส่วนพารามิเตอร์ที่ 2 คือ การเช็ทพารามิเตอร์ส่งไปทางคลาสเทมเพลต เพื่อใช้งานประมวลผลในส่วนของ query
-
Edited by Tanasit Auewongaree
การใช้งานคำสั่งออกรายงานเอกซ์เซล
ในส่วนของคอมเมนต์นี้จะเป็น ตัวอย่างรหัสคำสั่ง export และหลักการทำงานเบื้องต้น
ตัวอย่าง : export
var export = _excel.export("...filename...", () => //<=Action
{
	//=>Step 1 : จัดการ Properties

	//=>Step 2 : จัดการ Sheet
});
คำอธิบาย
จากรหัสคำสั่ง เรียกใช้คำสั่ง export ภายใน Provider เพื่อออกรายงาน สามารถแบ่งการทำงานเป็น 2 ขั้นตอน คือ
- ขั้นตอนที่ 1 : จะเป็นส่วนของการกำหนดค่า Properties ให้กับแฟ้มเอกสารเอกซ์เซล
- ขั้นตอนที่ 2 : จะเป็นส่วนของสร้างชีท ให้กับเอกสาร โดยจะนำ ผลลัพธ์จากการสร้างรายงานมาเก็บไว้ที่ตัวแปร export โดยชุดคำสั่ง export จะคืนผลลัพธ์เป็นคลาสอ็อปเจกต์ ExportExcelResult.cs ซึ่งคลาสดังกล่าว จะมีแอตทริบิวต์ให้บริการดังนี้
ตัวอย่าง : ExportExcelResult.cs
public class ExportExcelResult
{

	public bool success { get; set; } = false;

        public IRawFile file { get; set; } = new RawFile();

        public Exception exception { get; set; } = null;
}
คำอธิบาย
ตัวแปร success เป็นตัวแปรประเภท bool ให้ผลลัพธ์เพื่อบอกว่าในการประมวลผลเราสามารถสร้างรายงานได้หรือไม่
- true = สำเร็จ
- false = ล้มเหลว
ตัวแปร file เป็นตัวแปรประเภท คลาสอ็อปเจกต์ IRawFile โดยภายใน IRawFile มีแอตทริบิวต์ให้บริการดังนี้
- fileName = ชื่อไฟล์
- rawBytes = แปลงแฟ้มเอกสารเป็น byte array
- data = เก็บข้อมูล data
ตัวแปร exception หากพบ Exception ระหว่างสร้างเอกสารจะสามารถแสดงผลค่าล้มเหลวได้จากตัวแปรนี้
-
Edited by Tanasit Auewongaree
การกำหนด Properties ภายในเอกสาร
คอมเมนต์ส่วนนี้ อธิบายเกี่ยวกับการใช้คำสั่ง กำหนดค่า Properties ให้กับเอกสาร
ตัวอย่าง : การใช้คำสั่งกำหนด Properties
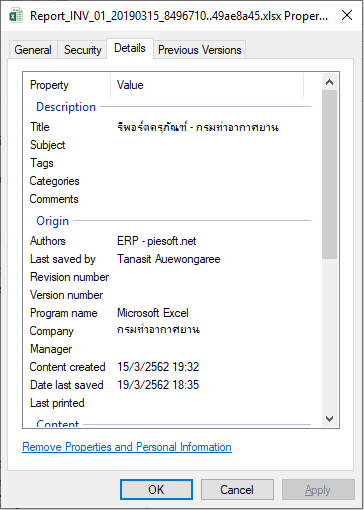
var export = _excel.export("...filename...", () => //<=Action
{
	//=>Step 1 : จัดการ Properties
	_excel.title("รีพอร์ตครุภัณฑ์ - กรมท่าอากาศยาน");
        _excel.company("กรมท่าอากาศยาน");
        _excel.author("ERP - piesoft.net");
	_excel.created(DateTime.Now)

        //=>Step 2 : จัดการ Sheet
});
คำอธิบาย
- _excel.title กำหนดชื่อหัวข้อให้กับ Properties
- _excel.company กำหนดชื่อบริษัทให้กับ Properties
- _excel.author กำหนดชื่อผู้สร้างรายงานให้กับ Properties
- _excel.created กำหนดวันที่ และเวลาตอนสร้างรายงานให้กับ Properties
หมายเหตุ : Properties คือข้อมูลดังรุปภาพ
-
Edited by Tanasit Auewongaree
การออกรายงานเอกสารชีทเดียว (One Sheet)
ในการออกรายงาน หากผู้ใช้งานเรียกใช้ส่วนเสริมสำหรับออกรายงานนี้ ชุดรหัสคำสั่งที่ผู้ใช้งานต้องเขียนจะประกอบโดยโครงสร้างรหัสโปรแกรม ตามรหัสโปรแกรมต่อไปนี้
//=>ประกาศอ็อปเจกต์ เทมเพลตคลาส
INV_01Export inv_01 = new INV_01Export();

//=>สร้างรายงาน
var export = _excel.export("INV_01", () =>  //=>พารามิเตอร์ที่ 1 : ชื่อรายงาน และพารามิเตอร์ที่ 2 : แอ็คชัน หรือการประมวลผลรายงาน
{
    //=>Step 1 : เซ็ท  Properties
    ....

    //=>Step 2 : จัดการ Sheet
    _excel.makeWorkSheet("กรมท่าอากาศยาน", inv_01); //=>สร้างชีทภายในเอกสาร พารามิเตอร์ 1 : ชื่อชีท และพารามิเตอร์ 2 : อ็อปเจกต์เทมเพลตคลาส
});
คำอธิบาย
ในการออกรายงาน เราจำเป็นต้องมีแบบแปลนต้นแบบของชุดรายงาน (Template) อยู่ก่อน เพื่อส่งดาต้าเข้าไปที่เทมเพลต เพื่อประมวลผล และสร้างแฟ้มรายงานตามแบบแปลนที่กำหนดไว้ โดยองค์ประกอบของแบบแปลนสามารถดูได้จากเนื้อหาด้านล่าง
หมายเหตุ :
จากรหัสโปรแกรมในคอมเมนต์นี้ จะเป็นการออกรายงานที่มีเพียงชีทเดียว หรือเทมเพลตที่อิมพลีเมนต์ขึ้นนั้นรองรับเฉพาะรายงานชีทเดียว หากผู้ใช้งานต้องการเขียนรายงานที่มีหลายชีทสามารถอ่านจากคอมเม้นต์ลำดับถัดไป
-
Edited by Tanasit Auewongaree
การออกรายงานเอกสารหลายชีท (Multiple Sheet)
บางครั้งในการสร้างรายงานจะมีบางเคสที่รายงานอาจมีได้หลายชีท แต่ใช้งานชุดข้อมูลที่คล้ายคลึงกัน เราสามารถใช้รหัสโปรแกรมต่อไปนี้เพื่อแนวทางดังกล่าว
//=>ประกาศอ็อปเจกต์ เทมเพลตคลาส
INV_01Export inv_01 = new INV_01Export();

//=>สร้างรายงาน
var export = _excel.export("INV_01", () =>  //=>พารามิเตอร์ที่ 1 : ชื่อรายงาน และพารามิเตอร์ที่ 2 : แอ็คชัน หรือการประมวลผลรายงาน
{
    //=>Step 1 : เซ็ท  Properties
    ....

    //=>Step 2 : จัดการ Sheet
    _excel.makeWorkSheets("กรมท่าอากาศยาน", inv_01); //=>สร้างชีทภายในเอกสาร พารามิเตอร์ 1 : ชื่อชีท และพารามิเตอร์ 2 : อ็อปเจกต์เทมเพลตคลาส
});
คำอธิบาย
ในการออกรายงาน เราจำเป็นต้องมีแบบแปลนต้นแบบของชุดรายงาน (Template) อยู่ก่อน เพื่อส่งดาต้าเข้าไปที่เทมเพลต เพื่อประมวลผล และสร้างแฟ้มรายงานตามแบบแปลนที่กำหนดไว้ โดยองค์ประกอบของแบบแปลนสามารถดูได้จากเนื้อหาด้านล่าง
ข้อควรระวัง
- รหัสคำสั่งสร้างชีทหลายชีท แตกต่างจากชีทเดียวเพียงเติม ตัว s ต่อท้าย _excel.makeWorkSheet = แบบชีทเดียว และ _excel.makeWorkSheets = แบบหลายชีท
- ในการออกรายงานหลายชีทในแฟ้มเอกสารเดียว ควรอิมพลีเมนต์เทมเพลตคลาสให้แบ่งชุดข้อมูลออกเป็นกลุ่ม เพื่อให้โปรแกรมเบื้องหลังสามารถวนลูปดาต้า เพื่อสร้างชีทได้
-
Edited by Tanasit Auewongaree
การสร้างเทมเพลตรายงาน (Template)
แหล่งจัดเก็บคลาสเทมเพลต
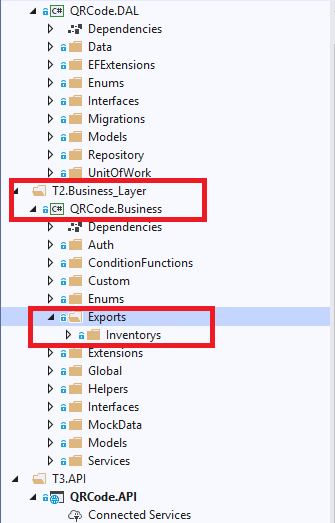
การสร้างคลาสเทมเพลต จะสร้างไว้ที่ ชั้น Business logic layer (Tier2) โดยสร้างไว้ที่โฟเดอร์ Exports ดังภาพตัวอย่าง
คำอธิบาย
- กรอบสีแดงด้านบนแสดงให้เห็นว่าโฟเดอร์ Exports จะอยู่ภายใต้ Business logic layer
- กรอบสีแดงด้านล่างแสดงให้เห็นว่าภายในโฟเดอร์ Exports จะมีโฟเดอร์ย่อยลงไปอีก นั่นคือโฟเดอร์ที่แบ่งแยกกลุ่มเทมเพลต อีกทีหนึ่ง โดยจากตัวอย่างตามภาพคือ Inventory นั่นหมายถึง โฟเดอร์ย่อยนี้เก็บเทมเพลตสำหรับออกรายงานครุภัณฑ์ เป็นต้น
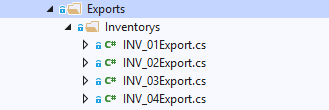
คำอธิบาย
- ภายใต้โฟเดอร์ Inventorys จะประกอบไปด้วยคลาสเทมเพลตสำหรับออกรายงานข้อมูลครุภัณฑ์รูปแบบต่าง ๆ
ข้อกำหนดในการตั้งชื่อคลาสเทมเพลต
- ควรตั้งชื่อ {{ShortName}}_{{Type}}Export.cs
- {{ShortName}} คือ ชื่อย่อของกลุ่มรายงาน เช่น Inventorys ย่อเป็น INV
- {{Type}} คือ ประเภทของรายงาน (อิงจากหน้าเว็บ เช่น รายงานครุภัณฑ์มี 4 เรื่องย่อย) เช่น 1. รายงานจำนวนครุภัณฑ์ คือ 01
- จากตัวอย่าง หากเรารวม ShortName และ Type เข้าด้วยกันจะได้ชื่อเทมเพลต ว่า INV_01Export.cs
การสร้างคลาสเทมเพลต
ในการสร้างคลาสเทมเพลตเราจะ ใช้วิธีการสร้างคลาสตามปกติ แต่เพิ่มเติมคือมีการ เอกซ์เทนด์ คลาสสำหรับช่วยเหลือในการสร้างรายงาน (จากรูปภาพ Architecture ด้านบนในแผ่นผืนผ้าที่ 5) เพื่อขอรับการสืบทอดวิธีออกรายงานจากคลาสแม่ และเรียนรู้ข้อบังคับ (Interface) เช่น หากต้องการออกรายงานจะต้องมี เมท็อดอะไรบ้าง การแยกส่วนการประมวลผลของเมท็อด และแต่ละเมท็อดมีคุณสมบัติอะไรบ้าง เป็นต้น
ตัวอย่าง : รหัสโปรแกรมเทมเพลต INV_01
/// <summary>
/// Code : INV_01
/// Template : 1.1 รายงานจำนวนครุภัณฑ์
/// </summary>
public class INV_01Export : ExportExcelSupport
{
    public override JObject collection<T>(T data = null)
    {
        throw new NotImplementedException();
    }

    public override void query()
    {
        throw new NotImplementedException();
    }

    public override void renderBody()
    {
        throw new NotImplementedException();
    }

    public override void renderHeader()
    {
        throw new NotImplementedException();
    }
}
คำอธิบาย
- เมื่อเราสร้างคลาส INV_01Export.cs เสร็จแล้วให้สร้างคอมเมนต์ที่หัวคลาส โดยกำหนด Code คือ ชื่อเรียกเทมเพลต {{ShortName}}_{{Type}} และกำหนด Template คือคำอธิบายเกี่ยวกับ เทมเพลต (ตามหน้าเว็บไซต์)
- เอกซ์เทนด์คลาส เพื่อขอสืบทอดวิธีการออกรายงาน
- สร้างเมท็อดที่เป็นข้อบังคับ เมื่อต้องการสืบทอดวิธีการออกรายงาน (Implement Interface)
หน้าที่การทำงานของเมท็อด
เราสามารถลำดับรายการที่เริ่มต้น ไปจนถึงสิ้นสุดได้ ดังนี้
- query
- collection
- renderHeader
- renderBody
โดยแต่ละส่วนมีหน้าที่การทำงานแตกต่างกัน หลักๆ ดังนี้
- การทำงานของเมท็อด query มีขึ้นเพื่อให้ผู้ใช้งานเขียนรหัสโปรแกรมสำหรับคิวรี่ดาต้าเบสเพื่อสร้างข้อมูลสำหรับนำไปบรรจุใส่ชีท และ เรียกใช้งาน พารามิเตอร์ ที่ส่งมาจากแผ่นผืนผ้าที่ 3 นำมาเป็นเงื่อนไขในการคิวรี่ข้อมูล รวมถึงการเช็ทพารามิเตอร์เพิ่มเติมสำหรับใช้ภายในเทมเพลตด้วย
- collection รับหน้าที่ในการสร้างโมเดลก้อนใหม่จากดาต้าที่คิวรี่ ซึ่งลักษณะการทำงานจะเป็นการ Mapper Key จากพารามิเตอร์ data เพื่อสร้างโมเดลใหม่ที่เป็นข้อมูล JObject หรือคือการแปลง ดาต้าไปเป็น JObject โดยเลือกเฉพาะคีย์ที่อยู่ภายใน data ที่เราสนใจ
- renderHeader เขียนกำหนดเทมเพลตส่วนหัวชีท ว่ามีหัวตารางอะไรบ้างโดยไม่เกี่ยวกับเนื้อหา
- renderBody เขียนกำหนดเทมเพลตส่วนเนื้อหา
-
Edited by Tanasit Auewongaree
การเรียกใช้งาน Parameter และการกำหนดค่า Parameter
คอมเมนต์นี้ เป็นตัวอย่างการส่งผ่าน พารามิเตอร์ในชั้น Service Interface (แผ่นผืนผ้าที่ 3) ไปยังคลาสเทมเพลต (แผ่นผืนผ้าที่ 5 - 6) เพื่อนำไปใช้ในการกำหนดเงื่อนไขของการคิวรี่ และกำหนดค่าผ่านเมท็อดคิวรี่ใน คลาสเทมเพลต เพื่อนำไปใช้ระหว่าง เมท็อด collection, renderHeader และ renderBody เป็นต้น
ในการเรียกใช้พารามิเตอร์จะต้องมีการ ฉีดพารามิเตอร์ไปยัง ExportExcelSupport ก่อนโดยผ่าน Provider ตัวอย่าง : การฉีดพารามิเตอร์ (Inject parameter)
var _excel = _exportExcelService.excelHelper(_unitOfWork, param);คำอธิบาย
param คือ ตัวแปร parameter ภายในชั้น Service Interface โดยเราจะกำหนดลงใน พารามิเตอร์ตัวที่ 2 ของคำสั่ง excelHelper เพื่อฉีดมันไปที่ แผ่นผืนผ้าที่ 5 และ 6 สำหรับใช้งาน
เมื่อเราฉีดพารามิเตอร์เรียบร้อยแล้ว เราจะสามารถเรียกใช้งานที่คลาสเทมเพลตได้ 3 รูปแบบ มีดังนี้
- รูปแบบที่ 1 ผ่านตัวแปร this._parameter ซึ่งเป็นตัวแปรที่อยู่ที่ ExportExcelSupport class หรือเก็บไว้ที่คลาสแม่ให้ คลาสเทมเพลตสืบทอด โดยรูปแบบที่ 1 this._parameter จะมีประเภทแอตทริบิวต์เป็น JObject ซึ่งคือ Json Linq โดยจากตัวอย่างจะใช้ Type dynamic เข้ารับเพื่อจัดการ Json ได้ง่ายขึ้น (ไม่รับคุณสมบัติ Linq ที่ JObject สืบทอดมา ทำให้จัดการได้ง่ายยิ่งขึ้น) โดยข้อควรระวัง ของแบบที่ 1 จะคือ ห้ามใช้งานตัวแปร dynamic ตรงๆ แต่ให้เช็ทเก็บไว้ที่ตัวแปรก่อน แล้วจึงนำตัวแปรที่มีประเภทถูกต้องตามค่า (Value) ไปใช้งาน
dynamic parameter = this._parameter; //รับ JObject ด้วย dynamic int invGroupId = int.Parse(parameter.invGroupId.ToString()); //ใช้ dynamic ตรง ๆไม่ได้นะคอมไพล์แยกได้ยาก เลยต้องแปลงค่าเก็บไว้ที่ตัวแปรตามประเภทที่ถูกต้อง- รูปแบบที่ 2 ผ่านเมท็อด getParameter ซึงรองรับเจเนริคไทพ์ โดยเมท็อดมีคุณสมบัติแปลง JObject ไปเป็น class ที่เรากำหนดได้ แต่ต้องมีโครงสร้าง Json ที่เหมาะสม เช่น แอตทริบิวต์ตรงกัน ประเภทตรงกัน เป็นต้น
var param = this.getParameter<DownloadParameter>(); //แปลง JObject class เป็น DownloadParameter class .... if (param.depId != 0) // วิธีการเรียกใช้ จะเหมือนการใช้อ็อปเจกต์ของคลาส เรียกแอตทริบิวต์ ทั่วไป { invRepo.where(w => w.DepartmentId == param.depId); }- รูปแบบที่ 3 ผ่านเมท็อด param ซึ่งรับพารามิเตอร์ key เพื่อดึงค่าจาก Value ออกมาแสดงผล
var _invGroupId = int.Parse(this.param("invGroupId")); // ดึงค่า value ของพารามิเตอร์ ชื่อ invGroupId ออกมาเก็บลงตัวแปรหมายเหตุ : การใช้งานขึ้นอยู้กับสถานการณ์
- รูปแบบที่ 1 และ2 เหมาะกับการใช้งาน ที่เมท็อดคิวรี่เท่านั้น
- รูปแบบที่ 3 สามารถใช้ในเมท็อด อื่น ๆ เช่น collection , renderHeader และ renderBody ได้
-
Edited by Tanasit Auewongaree
การสร้าง Mockup data
ในการพัฒนาโปรแกรมที่ผ่านมาพบว่า เราสามารถนำ Mockup data มาประยุกต์ใช้งานกับการทำโมดูลออกรายงานได้ยาก เนื่องจากโครงสร้างของระบบที่ดีไซน์ ไม่รองรับ หรืออาจส่งผลกระทบต่อส่วนอื่น หรือทำได้แต่ไม่เวิร์ค ยุ่งยากเกินไป ในส่วนเสริมการออกรายงาน เรามีการนำ ดีไซน์แพทเทิร์น ที่ช่วยให้การเข้าถึงอ็อปเจกต์บางอย่างเข้าด้วยกันได้ และห่อหุ้มอ็อปเจกต์เพื่อให้ง่ายต่อการจัดการ จึงสามารถแยกส่วนการพัฒนาโมดูลออกเอกสารออกมาไว้ที่เทมเพลตได้ จึงทำให้เกิดข้อดีดังนี้
- หากมีการแก้ไขเทมเพลต จะไม่กระทบต่อโครงสร้าง Service Interface
- ลดความซับซ้อน รหัสโปรแกรมภายใน Service Interface
- แยกส่วนของการพัฒนา และข้อกำหนดบังคับชัดเจน
ในความดีงามบ้างครั้ง ยังคงแฝงไว้ด้วยความเจ็บปวด... ข้อเสียดังนี้
- เพิ่มความซับซ้อนให้กับการพัฒนา
- เสียเวลาในการทำความเข้าใจ
กลับมาที่การ Mockup data เราจะทำไว้ที่เมท็อดคิวรี่ ภายในคลาสเทมเพลต เพื่อเปลี่ยนมาเป็น version 1.1 จะสามารถคิวรี่ข้อมูลให้ได้ตามการ Mockup จากนั้นจะพบว่าเราแก้ไขเพียง เมท็อดคิวรี่ เราก็สามารถออกรายงานได้ถูกต้องตามการ Mockup data เป็นต้น
public override void query()
{
    var data = new dynamic[] {
        new
        {
            number = "1",
            level = 1,
            text = "กรมท่าอากาศยาน",
            guid = "yyyyAA2323",
        },
        new {
            number = "1.1",
            level = 2,
            text = "บันไดเลื่อน",
            val_1 = 320,
            val_2 = 10,
            val_3 = 330,
            guid = "yyyyAA2323",
       },
       new
       {
            number  = "1.1.1",
            level = 3,
            text = "บันไดเลื่อน",
            val_1 = 320,
            val_2 = 10,
            val_3 = 330,
            guid = "yyyyAA2323",
       },
       ....
       },
       new
       {
            number  = "2.1.1",
            level = 3,
            text = "บันไดเลื่อน2",
            val_1 = 320,
            val_2 = 10,
            val_3 = 330,
            guid = "yyyyAA2325",
       }
    };

    this.setResources(data);
}
คำอธิบาย
จาก mockup data ข้างบนสำหรับการแสดงผลรายงาน ตามรูปภาพตัวอย่างต่อไปนี้
โดยจะเห็นว่ารายงานแบบนี้แบ่งเป็น 3 ชั้น ชั้นที่ 1 สำหรับ ท่าอากาศยาน , ชั้นที่ 2 สำหรับกลุ่มครุภัณฑ์ และชั้นที่ 3 สำหรับประเภทครุภัณฑ์ ในการ Mockup data จึงกำหนดแอตทริบิวต์ level สำหรับแยกลำดับชั้นข้อมูล และ guid สำหรับแยกชุดข้อมูลว่า ชั้นต่างๆ เป็นของ level อะไรเป็นต้น
การ Mockup data สำหรับเอกสารหลานชีท ควรมีการ Group by ข้อมูลด้วย
ตัวอย่างการกรุ๊ปข้อมูล
public override void query() { var data = new dynamic[] { ... } var group = data.GroupBy(g => g.invTypeName).ToList(); this.setResources(group); } -
Edited by Tanasit Auewongaree
การสร้าง Query database
คอมเมนต์นี้จะอธิบายการ เขียนคิวรี่ข้อมูลภายในคลาสเทมเพลต
ตัวอย่าง : การเขียนคิวรี่ง่าย ๆ ชีทเดียว
public override void query()
{
    var _invRepo = _unitOfWork.getRepository<InvInventory>();

    var data = _invRepo.get();

    this.setResources(_query);
}
ตัวอย่าง : การเขียนคิวรี่แบบมีเงื่อนไข (WHERE Clause) และหลายชีท
public override void query()
{
    //=>Step 1 : Get parameter
    //=>สามารถเรียกใช้งานได้ 2 วิธี
    //=>วิธีที่ 1 : ผ่านตัวแปรพลวัต
    dynamic parameter = this._parameter;
    int invGroupId = int.Parse(parameter.invGroupId.ToString());
    int depId = int.Parse(parameter.depId.ToString());
    int invTypeId = int.Parse(parameter.invTypeId.ToString());

    //=>Step 2 : Query
    var invRepo = _unitOfWork.getRepository<InvInventory>();
    var depRepo = _unitOfWork.getRepository<DpDepartment>();
    var invTypeRepo = _unitOfWork.getRepository<InvType>();
    var invGroupRepo = _unitOfWork.getRepository<InvGroup>();

    invRepo.where(w => w.IsEnable == 1)
        .where(w => w.IsDelete == 0);


    depRepo.where(w => w.IsEnable == 1)
        .where(w => w.IsDelete == 0);

    if (invGroupId != 0)
    {
        invRepo.where(w => w.InvGroupId == invGroupId);
        invGroupRepo.where(w => w.InvGroupId == invGroupId);
    }

    if (invTypeId != 0)
    {
        invRepo.where(w => w.InvTypeId == invTypeId);
        invTypeRepo.where(w => w.InvTypeId == invTypeId);
    }

    if (depId != 0)
    {
        invRepo.where(w => w.DepartmentId == depId);
        depRepo.where(w => w.DepId == depId);
    }

    var _data = invRepo.get();
    var department = _data.GroupBy(g => g.DepartmentId).ToList();

    this.setResources(_query);
}
หมายเหตุ :
- ในการเขียนคิวรี่นั้น แทบทุกประการจะคล้ายกับที่เราเขียนทางฝั่ง Interface Service เพิ่มเติมมีการเพิ่ม ข้อกำหนด และคำสั่งบางส่วนเข้ามาเล็กน้อยเท่านั้น เช่น การใช้พารามิเตอร์ การเช็ทพารามิเตอร์ หรือ การเช็ทดาต้าเป็นต้น
- จากตัวอย่างรหัสคำสั้ง ด้านบนผู้พัฒนายังสามารถประยุกต์โดยได้ ก้อน data มาแล้ว จะ convert data เป็น Model ทีกำหนดขึ้นใหม่ก็ทำได้เช่นกัน
-
Edited by Tanasit Auewongaree
การสร้าง Collection
การกำหนด collection คือการสร้าง Model สำหรับชีท หน้านั้นๆ ขึ้น หรือ collection คือการนำ data จากคิวรี่ มาใช้เพื่อสร้างข้อมูลในหน้าชีทอีกทีหนึ่ง ยกตัวอย่าง เราคิวรี่ข้อมูล ครุภัณฑ์ที่มีฟิลด์มากมาย มาเก็บยัง ตัวแปร this._resource เพื่อรอเช็ท this._resource ไปเป็น this.data ผ่าน เมท็อด collection อีกครั้งเป็นต้น
ตัวอย่าง : การกำหนด collection จากข้อมูล data ตัวอย่างจาก Mockup data
public override JObject collection<T>(T data)
{
    return JObject.FromObject(new
    {
        title = "รายงานจำนวนครุภัณฑ์ กรมท่าอากาศยาน",
        createAt = "12 ธ.ค. 2561 15.00 น.",
        data = (from o in data
                where o.level == 1
                select new
                {
                    Col_1 = o.number,
                    Col_2 = o.text,
                    Row_2 = (from oo in data
                             where oo.level == 2 && oo.guid == o.guid
                             select new
                             {
                                  Col_1 = oo.number,
                                  Col_2 = oo.text,
                                  Col_3 = oo.val_1,
                                  Col_4 = oo.val_2,
                                  Col_5 = oo.val_3,
                                  Row_3 = (from ooo in data
                                           where ooo.level == 3 && ooo.guid == o.guid
                                           select new
                                           {
                                               Col_1 = ooo.number,
                                               Col_2 = ooo.text,
                                               Col_3 = ooo.val_1,
                                               Col_4 = ooo.val_2,
                                               Col_5 = ooo.val_3,
                                           })
                             })
                 })
      });
}
หมายเหตุ :
- จากตัวอย่างคือ การจับคคู่ข้อมูลเพื่อนำไปใช้อีกทีหนึ่ง
-
Edited by Tanasit Auewongaree
การวาดหัวตาราง และเนื้อหา
การวาดหัวตาราง และเนื้อหาของชีท สามารถทำได้โดยกำหนด หัวตารางที่ส่วนของเมท็อด renderHeader และ ส่วนเนื้อหาที่ renderBody
ตัวอย่าง : วาดส่วนหัว
public override void renderHeader()
{
    // กำหนดเดต้า และพารามิเตอร์
    dynamic _data = this.data;
    dynamic parameter = this._parameter;

    //ความกว้างของ column
    this.worksheet.Column(2).colWidth(56);
    this.worksheet.Column(3).colWidth(15);
    this.worksheet.Column(4).colWidth(15);
    this.worksheet.Column(5).colWidth(15);
    this.worksheet.Row(5).rowHeight(5.25);

    // ส่่วนของหัวเรื่อง
    using (ExcelRange range = this.worksheet.Cells[2, 1, 2, 5])
    {
        range.Value = _data.title.ToString();
        range.Merge = true;
        range.strong(); //ตัวหนา
        range.alignCenter(); //อยู่กึ่งกลาง
    }


    // ส่วนของวันที่พิมพ์รายงาน
    using (ExcelRange range = this.worksheet.Cells[4, 3, 4, 5])
    {
        range.Value = "วันที่พิมพ์รายงาน : " + parameter.createAt.ToString();
        range.Merge = true;
        range.fontSize(14); //ขนาดตัวอักษร
        range.alignRight(); //ชิดขวา
    }

    // ส่วนของหัวตาราง
    // สีหัวตาราง
    this.worksheet.Cells[6, 1, 7, 5].backgroundColor(142, 169, 219);

    // ลำดับที่
    using (ExcelRange range = this.worksheet.Cells[6, 1, 7, 1])
    {
        range.Value = "ลำดับที่";
        range.Merge = true;
        range.strong(); //ตัวหนา
        range.alignCenter(); //อยู่ตรงกลาง
    }
    // ส่วนของหัวตาราง

    // รายการ
    using (ExcelRange range = this.worksheet.Cells[6, 2, 7, 2])
    {
        range.Value = "รายการ";
        range.Merge = true;
        range.strong(); //ตัวหนา
        range.alignCenter(); //อยู่ตรงกลาง
    }
    // ส่วนของหัวตาราง
     // จำนวน
    using (ExcelRange range = this.worksheet.Cells[6, 3, 6, 5])
    {
        range.Value = "จำนวน";
        range.Merge = true;
        range.strong(); //ตัวหนา
        range.alignCenter(); //อยู่ตรงกลาง
    }

    this.worksheet.Cells[7, 3].Value = "ใช้งานได้";
    this.worksheet.Cells[7, 4].Value = "ใช้งานไม่ได้";
    this.worksheet.Cells[7, 5].Value = "รวม";

    this.worksheet.Cells[7, 3, 7, 5].strong(); //ใช้งานได้ ใช้งานไม่ได้ รวม ตัวหนา
    this.worksheet.Cells[7, 3, 7, 5].alignCenter(); //ใช้งานได้ ใช้งานไม่ได้ รวม อยู่ตรงกลาง

    //เส้นของตาราง
    this.worksheet.Cells[6, 1, 7, 5].border(ExcelBorderStyle.Thin);
}
ตัวอย่าง : วาดเนื้อหา
public override void renderHeader() { int Row = 8; foreach (dynamic dep in this.data["data"]) { //---ท่าอากาศยาน //สี this.worksheet.Cells[Row, 1, Row, 5].backgroundColor("#B4C6E7"); this.worksheet.Cells[Row, 1].strong(); //เลข ตัวหนา this.worksheet.Cells[Row, 2].strong(); //ชื่อท่า ตัวหนา this.worksheet.Cells[Row, 1].alignCenter(); //เลข อยู่ตรงกลาง //ข้อความ this.worksheet.Cells[Row, 1].Value = Convert.ToDecimal(dep.Col_1.ToString()); this.worksheet.Cells[Row, 2].Value = dep.Col_2.ToString(); Row++; foreach (dynamic group in dep.Row_2) { //---กลุ่ม inv //สี this.worksheet.Cells[Row, 1, Row, 5].backgroundColor("#D9E1F2"); this.worksheet.Cells[Row, 3, Row, 5].strong(); //ใช้งาน ไม่ได้ รวม ตัวหนา this.worksheet.Cells[Row, 1].alignCenter(); //เลข อยู่ตรงกลาง this.worksheet.Cells[Row, 3, Row, 5].alignCenter(); //ใช้งานได้ ไม่ได้ รวม อยู่ตรงกลาง this.worksheet.Cells[Row, 1].Value = Convert.ToDecimal(group.Col_1.ToString()); this.worksheet.Cells[Row, 2].Value = group.Col_2.ToString(); this.worksheet.Cells[Row, 3].Value = Convert.ToDecimal(group.Col_3.ToString()); this.worksheet.Cells[Row, 4].Value = Convert.ToDecimal(group.Col_4.ToString()); this.worksheet.Cells[Row++, 5].Value = Convert.ToDecimal(group.Col_5.ToString()); foreach (dynamic type in group.Row_3) { //---ประเภท inv this.worksheet.Cells[Row, 3, Row, 5].alignCenter(); //ใช้งานได้ ไม่ได้ รวม อยู่ตรงกลาง this.worksheet.Cells[Row, 2].Value = type.Col_1.ToString(); this.worksheet.Cells[Row, 3].Value = Convert.ToDecimal(type.Col_2.ToString()); this.worksheet.Cells[Row, 4].Value = Convert.ToDecimal(type.Col_3.ToString()); this.worksheet.Cells[Row++, 5].Value = Convert.ToDecimal(type.Col_4.ToString()); } } //ใส่เส้นตาราง this.worksheet.Cells[8, 1, Row - 1, 5].border(ExcelBorderStyle.Thin); } this.worksheet.Cells[1, 1, Row - 1, 5].valignCenter(); //ข้อความแนวตั้งอยู่ตรงกึ่งกลาง } -
Edited by Tanasit Auewongaree
การควบคุมไฟล์จากส่วนเสริม IUploadFileService
ในการออกรายงาน ExportExcelResult จะคืนผลลัพธ์เอกสารเอกซ์เซลออกมาเป็น byte[] ทำให้เราต้องมาจัดการนำ byte[] เข้า Stream เพื่อจัดการบันทึกไฟล์อีกทีหนึ่ง ซึ่งขั้นตอนนี้เราสามารถนำมาประยุกต์ใช้ร่วมกับ IUploadFileService ได้จะทำให้การจัดการไฟล์ของเราง่ายขึ้นไปอีกขั้น โดยสามารถทำตามตัวอย่างต่อไปนี้
ตัวอย่าง : การใช้ IUploadFileService สร้างไฟล์เอกซ์เซลจาก ExportExcelResult
IUploadFileProvider file = null;
INV_01Export inv_01 = new INV_01Export();

var export = _excel.export(...filename..., () =>
{
    //=>Step 1 : เซ็ท  Properties
    ....
    //=>Step 2 : จัดการ Sheet
    ....
});

if (export.success)
{
    file = _uploadFileService.make(export.file);
    file.setPath(path);
    file.save(); // บันทึกไฟล์
}
คำอธิบาย
- เราสามารถรู้ได้ว่าการประมวลผลเพื่อสร้างรายงานสำเร็จ หรือไม่ ได้จากตัวแปร success ที่อยู่ภายใน ExportExcelResult
- file = _uploadFileService.make(export.file); คือนำอ็อปเจกต์ที่เก็บไว้ภายใน ExportExcelResult มาสร้างอ็อปเจกต์ IUploadFileProvider
- หลังจาก file คืออินสแตนซ์ของคลาส IUploadFileProvider จะสามารถเรียกใช้งานคุณสมบัติที่ Provider จัดเตรียมไว้ให้บริการได้
- file.setPath(path); คือตัวอย่างการกำหนดค่า path หรือ ตำแหน่งโฟเดอร์ให้กับไฟล์
- file.save(); คือการบันทึก
หมายเหตุ :
หากต้องการทราบว่า IUploadFileService มีบริการอะไรบ้างสามารถดูได้ ที่นี่
-
Edited by Tanasit Auewongaree
เทคนิคส่วนเสริมจัดการสไตล์ภายในชีท
ในการจัดการสไตล์ EPPlus.Core ได้เตรียมชุดคำส่งไว้ให้เราแล้ว ซึ่งครอบคลุมทั้งจักรวาลของการจัดการสไตล์ บนเอกซ์เซล แต่ว่าการเรียกใช้งานทำได้ค่อนข้างยาก และเยอะมากทำให้ ExportExcelSupport ต้องเตรียมส่วนของการช่วยเหลือในเรื่องการจัดการสไตล์ของชีทเข้ามาช่วยผู้ใช้งาน ให้เขียนคำสั่งสั้นลงไปอีก จึงขอนำเสนอฟีเจอร์เล็กๆ น้อยๆ เพื่อช่วยในการจัดการสไตล์ชีท มีดังนี้
หมวดการจัดการสไตล์ชีท
-
Row - Column
- ExcelWorksheet defaultRowHeight(this ExcelWorksheet excelSheet, double height)
- ExcelWorksheet defaultColWidth(this ExcelWorksheet excelSheet, double width)
- ExcelRow rowHeight(this ExcelRow excelRow, double height)
- ExcelRange autoWidth(this ExcelRange excelRange)
- ExcelColumn colWidth(this ExcelColumn excelColumn, double width)
-
Text
- ExcelWorksheet defaultFontSize(this ExcelWorksheet excelSheet, object fontSize)
- ExcelWorksheet defaultFontFamily(this ExcelWorksheet excelSheet, string fontFamily)
- ExcelRow fontSize(this ExcelRow excelRow, float fontSize)
- ExcelRange fontSize(this ExcelRange excelRange, float fontSize)
- ExcelColumn fontSize(this ExcelColumn excelColumn, float fontSize)
- ExcelRow strong(this ExcelRow excelRow)
- ExcelRange strong(this ExcelRange excelRange)
- ExcelColumn strong(this ExcelColumn excelColumn)
- ExcelColumn wrapText(this ExcelColumn excelColumn, bool wrap)
-
Text align
- ExcelRow alignCenter(this ExcelRow excelRow)
- ExcelRow alignLeft(this ExcelRow excelRow)
- ExcelRow alignRight(this ExcelRow excelRow)
- ExcelRange alignCenter(this ExcelRange excelRage)
- ExcelRange alignLeft(this ExcelRange excelRage)
- ExcelRange alignRight(this ExcelRange excelRage)
- ExcelColumn alignCenter(this ExcelColumn excelRage)
- ExcelColumn alignLeft(this ExcelColumn excelRage)
- ExcelColumn alignRight(this ExcelColumn excelRage)
- ExcelRow valignCenter(this ExcelRow excelRow)
- ExcelRow valignTop(this ExcelRow excelRow)
- ExcelRow valignBottom(this ExcelRow excelRow)
- ExcelRange valignCenter(this ExcelRange excelRage)
- ExcelRange valignTop(this ExcelRange excelRage)
- ExcelRange valignBottom(this ExcelRange excelRage)
- ExcelColumn valignCenter(this ExcelColumn excelColumn)
- ExcelColumn valignTop(this ExcelColumn excelColumn)
- ExcelColumn valignBottom(this ExcelColumn excelColumn)
-
Border
- ExcelRange border(this ExcelRange excelRange, ExcelBorderStyle borderStyle)
-
Text color
- ExcelRow textColor(this ExcelRow excelRow, string codeColor)
- ExcelRow textColor(this ExcelRow excelRow, Color color)
- ExcelRow textColor(this ExcelRow excelRow, byte r, byte g, byte b)
- ExcelRange textColor(this ExcelRange excelRange, string codeColor)
- ExcelRange textColor(this ExcelRange excelRange, Color color)
- ExcelRange textColor(this ExcelRange excelRange, byte r, byte g, byte b)
- ExcelColumn textColor(this ExcelColumn excelColumn, string codeColor)
- ExcelColumn textColor(this ExcelColumn excelColumn, Color color)
- ExcelColumn textColor(this ExcelColumn excelColumn, byte r, byte g, byte b)
-
Background color
- ExcelRow backgroundColor(this ExcelRow excelRow, string codeColor)
- ExcelRow backgroundColor(this ExcelRow excelRow, Color color)
- ExcelRow backgroundColor(this ExcelRow excelRow, byte r, byte g, byte b)
- ExcelRange backgroundColor(this ExcelRange excelRange, string codeColor)
- ExcelRange backgroundColor(this ExcelRange excelRange, Color color)
- ExcelRange backgroundColor(this ExcelRange excelRange, byte r, byte g, byte b)
- ExcelColumn backgroundColor(this ExcelColumn excelColumn, string codeColor)
- ExcelColumn backgroundColor(this ExcelColumn excelColumn, Color color)
- ExcelColumn backgroundColor(this ExcelColumn excelColumn, byte r, byte g, byte b)
-
Format
- ExcelRange format(this ExcelRange excelRange, string formatter)
-
Row - Column
-
Edited by Tanasit Auewongaree
การอิมพลีเมนต์ / ตัวอย่างการใช้งานจริง
ตัวอย่างการนำ ชุดรหัสคำสั่งเสริมส่วนออกรายงานมาใช้งานจริง สามารถทำได้ตามตัวอย่างด้านล่างนี้ หรือสามารถดูรายละเอียดเพิ่มเติมได้จากโฟเดอร์จัดเก็บ คลาสเทมเพลต การออกรายงานที่ Tier2 ตามตำแหน่งโฟเดอร์ ดังนี้
ตำแหน่งโฟเดอร์
- {{root_project}}/{{project_tier2}}/Exports/Inventorys/*
/// <summary> /// Code : INV_01 /// Template : 1.1 รายงานจำนวนครุภัณฑ์ /// </summary> public class INV_01Export : ExportExcelSupport { public override JObject collection<T>(T data = null) { var datas = data as IEnumerable<dynamic>; //=>Map object var MapData = JObject.FromObject(new { title = "รายงานจำนวนครุภัณฑ์ กรมท่าอากาศยาน", data = (from d in datas where d.level == 1 select new { Col_1 = d.number, Col_2 = d.deps.Name, Row_2 = (from gr in datas where gr.level == 2 && gr.guidp == d.guid select new { Col_1 = gr.number, Col_2 = gr.name, Col_3 = gr.use, Col_4 = gr.notUse, Col_5 = gr.sum, Row_3 = (from ty in datas where ty.level == 3 && ty.guid == gr.guid select new { Col_1 = ty.number + " " + ty.name, Col_2 = ty.use, Col_3 = ty.notUse, Col_4 = ty.sum }) }) }) }); return MapData; } public override void query() { //=>Step 1 : Get parameter //=>สามารถเรียกใช้งานได้ 2 วิธี //=>วิธีที่ 1 : ผ่านตัวแปรพลวัต dynamic parameter = this._parameter; int invGroupId = int.Parse(parameter.invGroupId.ToString()); int depId = int.Parse(parameter.depId.ToString()); int invTypeId = int.Parse(parameter.invTypeId.ToString()); //var _query = new List<dynamic>(); //=>Step 2 : Query var invRepo = _unitOfWork.getRepository<InvInventory>(); var depRepo = _unitOfWork.getRepository<DpDepartment>(); var invTypeRepo = _unitOfWork.getRepository<InvType>(); var invGroupRepo = _unitOfWork.getRepository<InvGroup>(); invRepo.where(w => w.IsEnable == 1) .where(w => w.IsDelete == 0); depRepo.where(w => w.IsEnable == 1) .where(w => w.IsDelete == 0); if (invGroupId != 0) { invRepo.where(w => w.InvGroupId == invGroupId); invGroupRepo.where(w => w.InvGroupId == invGroupId); } if (invTypeId != 0) { invRepo.where(w => w.InvTypeId == invTypeId); invTypeRepo.where(w => w.InvTypeId == invTypeId); } if (depId != 0) { invRepo.where(w => w.DepartmentId == depId); depRepo.where(w => w.DepId == depId); } dynamic _queryDep = null; dynamic _queryGroup = null; dynamic _queryType = null; List<dynamic> _query = new List<dynamic>(); var _data = invRepo.get(); var department = _data.GroupBy(g => g.DepartmentId).ToList(); var depNumber = 1; foreach (var dep in department) { var guId = StringExtension.strRandom(20); int departmentId = dep.FirstOrDefault().DepartmentId.Value; var _dep = depRepo.get().FirstOrDefault(f => f.DepId == departmentId); if (_dep != null) { _queryDep = _dep; _query.Add(new // add level 1 { number = depNumber, deps = _queryDep, guid = guId, level = 1, }); var group = dep.GroupBy(g => g.InvGroupId).ToList(); var groupNumber = 1; foreach (var gr in group) { //var repoInvGroup = _unitOfWork.getRepository<InvGroup>(); var groupId = gr.FirstOrDefault().InvGroupId; var _group = invGroupRepo.where(w => w.IsDelete == 0).where(w => w.IsEnable == 1).get() .FirstOrDefault(f => f.InvGroupId == groupId); if (_group != null) { var guIdgroup = StringExtension.strRandom(20); _queryGroup = new { number = depNumber + "." + groupNumber, level = 2, guidp = guId, guid = guIdgroup, name = _group.Name }; var type = gr.GroupBy(g => g.InvTypeId).ToList(); var typeNumber = 1; int sumUse = 0; int sumNotUse = 0; int total = 0; foreach (var ty in type) { var typeId = ty.FirstOrDefault().InvTypeId; var _type = invTypeRepo.where(w => w.IsDelete == 0).where(w => w.IsEnable == 1).get().Where(w => w.InvGroupId == groupId).FirstOrDefault(f => f.InvTypeId == typeId); if (_type != null) { int use = invRepo.where(w => w.Status == 1 || w.Status == 3).where(w => w.InvGroupId == groupId).where(w => w.DepartmentId == departmentId).where(w => w.InvTypeId == typeId).count(); int notUse = invRepo.where(w => w.Status == 0 || w.Status == 2).where(w => w.InvGroupId == groupId).where(w => w.DepartmentId == departmentId).where(w => w.InvTypeId == typeId).count(); sumUse += use; sumNotUse += notUse; total += (use + notUse); _queryType = new { number = depNumber + "." + groupNumber + "." + typeNumber++, level = 3, guid = guIdgroup, name = _type.Name, use = use, notUse = notUse, sum = use + notUse }; _query.Add(_queryType); // add level 3 } } _queryGroup = new { number = _queryGroup.number, level = _queryGroup.level, guidp = _queryGroup.guidp, guid = _queryGroup.guid, name = _queryGroup.name, use = sumUse, notUse = sumNotUse, sum = total }; _query.Add(_queryGroup); // add level 2 groupNumber++; } } depNumber++; } } //=>Step 3 : Set data this.setResources(_query); //=>Step 4 : Set other parameter parameter.createAt = DateTime.Now.ToString("dd MMM yyyy HH.mm น.", DateTimeExtension.format_th); } public override void renderBody() { int Row = 8; if (this.data["data"].Count() == 0) { this.worksheet.Cells[Row, 1, Row, 5].Value = "ไม่พบข้อมูล"; this.worksheet.Cells[Row, 1, Row, 5].Merge = true; this.worksheet.Cells[Row, 1, Row, 5].alignCenter(); //ใส่เส้นตาราง this.worksheet.Cells[Row, 1, Row, 5].border(ExcelBorderStyle.Thin); } else { foreach (dynamic dep in this.data["data"]) { //---ท่าอากาศยาน //สี this.worksheet.Cells[Row, 1, Row, 5].backgroundColor("#B4C6E7"); this.worksheet.Cells[Row, 1].strong();//เลข ตัวหนา this.worksheet.Cells[Row, 2].strong();//ชื่อท่า ตัวหนา this.worksheet.Cells[Row, 1].alignCenter();//เลข อยู่ตรงกลาง //ข้อความ this.worksheet.Cells[Row, 1].Value = Convert.ToDecimal(dep.Col_1.ToString()); this.worksheet.Cells[Row, 2].Value = dep.Col_2.ToString(); Row++; foreach (dynamic group in dep.Row_2) { //---กลุ่ม inv //สี this.worksheet.Cells[Row, 1, Row, 5].backgroundColor("#D9E1F2"); this.worksheet.Cells[Row, 3, Row, 5].strong();//ใช้งาน ไม่ได้ รวม ตัวหนา this.worksheet.Cells[Row, 1].alignCenter();//เลข อยู่ตรงกลาง this.worksheet.Cells[Row, 3, Row, 5].alignCenter();//ใช้งานได้ ไม่ได้ รวม อยู่ตรงกลาง this.worksheet.Cells[Row, 1].Value = Convert.ToDecimal(group.Col_1.ToString()); this.worksheet.Cells[Row, 2].Value = group.Col_2.ToString(); this.worksheet.Cells[Row, 3].Value = Convert.ToDecimal(group.Col_3.ToString()); this.worksheet.Cells[Row, 4].Value = Convert.ToDecimal(group.Col_4.ToString()); this.worksheet.Cells[Row++, 5].Value = Convert.ToDecimal(group.Col_5.ToString()); foreach (dynamic type in group.Row_3) { //---ประเภท inv this.worksheet.Cells[Row, 3, Row, 5].alignCenter();//ใช้งานได้ ไม่ได้ รวม อยู่ตรงกลาง this.worksheet.Cells[Row, 2].Value = type.Col_1.ToString(); this.worksheet.Cells[Row, 3].Value = Convert.ToDecimal(type.Col_2.ToString()); this.worksheet.Cells[Row, 4].Value = Convert.ToDecimal(type.Col_3.ToString()); this.worksheet.Cells[Row++, 5].Value = Convert.ToDecimal(type.Col_4.ToString()); } } //ใส่เส้นตาราง this.worksheet.Cells[8, 1, Row - 1, 5].border(ExcelBorderStyle.Thin); } } this.worksheet.Cells[1, 1, Row - 1, 5].valignCenter(); //ข้อความอยู่ตรงกลางแนวตั้ง } public override void renderHeader() { dynamic _data = this.data; //ความกวางของ column this.worksheet.Column(2).colWidth(56); this.worksheet.Column(3).colWidth(15); this.worksheet.Column(4).colWidth(15); this.worksheet.Column(5).colWidth(15); this.worksheet.Row(5).rowHeight(5.25); // ส่วนของหัวเรื่อง using (ExcelRange range = this.worksheet.Cells[2, 1, 2, 5]) { range.Value = _data.title.ToString(); range.Merge = true; range.strong(); //ตัวหนา range.alignCenter(); //อยู่กึ่งกลาง } // ส่วนของวันที่พิมพ์รายงาน dynamic parameter = this._parameter; using (ExcelRange range = this.worksheet.Cells[4, 3, 4, 5]) { range.Value = "วันที่พิมพ์รายงาน : " + parameter.createAt.ToString(); range.Merge = true; range.fontSize(14); //ขนาดตัวอักษร range.alignRight(); //ชิดขวา } // ส่วนของหัวตาราง // สีหัวตาราง this.worksheet.Cells[6, 1, 7, 5].backgroundColor(142, 169, 219); // ลำดับที่ using (ExcelRange range = this.worksheet.Cells[6, 1, 7, 1]) { range.Value = "ลำดับที่"; range.Merge = true; range.strong();//ตัวหนา range.alignCenter();//อยู่ตรงกลาง } // ส่วนของหัวตาราง // รายการ using (ExcelRange range = this.worksheet.Cells[6, 2, 7, 2]) { range.Value = "รายการ"; range.Merge = true; range.strong();//ตัวหนา range.alignCenter();//อยู่ตรงกลาง } // ส่วนของหัวตาราง // จำนวน using (ExcelRange range = this.worksheet.Cells[6, 3, 6, 5]) { range.Value = "จำนวน"; range.Merge = true; range.strong();//ตัวหนา range.alignCenter();//อยู่ตรงกลาง } this.worksheet.Cells[7, 3].Value = "ใช้งานได้"; this.worksheet.Cells[7, 4].Value = "ใช้งานไม่ได้"; this.worksheet.Cells[7, 5].Value = "รวม"; this.worksheet.Cells[7, 3, 7, 5].strong();//ใช้งานได้ ใช้งานไม่ได้ รวม ตัวหนา this.worksheet.Cells[7, 3, 7, 5].alignCenter();//ใช้งานได้ ใช้งานไม่ได้ รวม อยู่ตรงกลาง //เส้นของตาราง this.worksheet.Cells[6, 1, 7, 5].border(ExcelBorderStyle.Thin); } } -
Edited by Tanasit Auewongaree
Extension จัดการ Row-Column
คือ ส่วนเสริมสำหรับจัดการสไตล์เรื่อง แถว และ คอลัมน์
ExcelWorksheet defaultRowHeight(this ExcelWorksheet excelSheet, double height)
- กำหนดค่าเริ่มต้นความสูงของแถวให้กับทุกแถวภายในชีท
ExcelWorksheet defaultColWidth(this ExcelWorksheet excelSheet, double width)
- กำหนดค่าเริ่มต้นความสูงของคอลัมน์ทุกคอลัมน์ภายในชีท
ExcelRow rowHeight(this ExcelRow excelRow, double height)
- กำหนดความสูงของแถว 1 แถว
ExcelRange autoWidth(this ExcelRange excelRange)
- กำหนดความกว้างของคอลัมน์ทั้งหมดในบริเวณ ให้มีความกว้างตามความยาวของข้อความ
ExcelColumn colWidth(this ExcelColumn excelColumn, double width)
- กำหนดความกว้างของคอลัมน์ 1 คอลัมน์
-
Extension จัดการ Text
คือ ส่วนเสริมสำหรับจัดการสไตล์ข้อความ
defaultFontSize(this ExcelWorksheet excelSheet, object fontSize)
- กำหนดค่าเริ่มต้นให้กับขนาดตัวหนังสือภายในชีท
defaultFontFamily(this ExcelWorksheet excelSheet, string fontFamily)
- กำหนดค่าเริ่มต้นของประเภทฟอนต์ให้กับตัวหนังสือภายในชีท
ExcelRow fontSize(this ExcelRow excelRow, float fontSize)
- กำหนดขนาดฟอนต์ระดับแถว 1 แถว
ExcelRange fontSize(this ExcelRange excelRange, float fontSize)
- กำหนดขนาดฟอนต์บริเวณแถว
ExcelColumn fontSize(this ExcelColumn excelColumn, float fontSize)
- กำหนดขนาดฟอนต์ระดับคอลัมน์
ExcelRow strong(this ExcelRow excelRow)
- กำหนดใช้ตัวหนังสือหนาระดับแถว
ExcelRange strong(this ExcelRange excelRange)
- กำหนดใช้ตัวหนังสือหนาระดับบริเวณ
ExcelColumn strong(this ExcelColumn excelColumn)
- กำหนดใช้ตัวหนังสือหนาระดับคอลัมน์
ExcelColumn wrapText(this ExcelColumn excelColumn, bool wrap)
- กำหนดตัดความยาวของข้อความไม่ให้เกินขนาดความกว้างที่กำหนด
-
Edited by Tanasit Auewongaree
Extension จัดการ Text align
คือ ส่วนของการจัดการสไตล์ตำแหน่งข้อความ
ExcelRow alignCenter(this ExcelRow excelRow)
- กำหนดให้ข้อความอยู่กึ่งกลางระดับแถว
ExcelRow alignLeft(this ExcelRow excelRow)
- กำหนดให้ข้อความชิดซ้ายระดับแถว
ExcelRow alignRight(this ExcelRow excelRow)
- กำหนดให้ข้อความชิดขวาระดับแถว
ExcelRange alignCenter(this ExcelRange excelRage)
- กำหนดให้ข้อความอยู่กึ่งกลางระดับบริเวณ
ExcelRange alignLeft(this ExcelRange excelRage)
- กำหนดให้ข้อความชิดซ้ายระดับบริเวณ
ExcelRange alignRight(this ExcelRange excelRage)
- กำหนดให้ข้อความชิดขวาระดับบริเวณ
ExcelColumn alignCenter(this ExcelColumn excelColumn)
- กำหนดให้ข้อความอยู่กึ่งกลางระดับคอลัมน์
ExcelColumn alignLeft(this ExcelColumn excelColumn)
- กำหนดให้ข้อความชิดซ้ายระดับคอลัมน์
ExcelColumn alignRight(this ExcelColumn excelColumn)
- กำหนดให้ข้อความชิดขวาระดับคอลัมน์
ExcelRow valignCenter(this ExcelRow excelRow)
- กำหนดให้ข้อความแนวตั้งระดับแถวอยู่กึ่งกลาง
ExcelRow valignTop(this ExcelRow excelRow)
- กำหนดให้ข้อความแนวตั้งระดับแถวอยู่บนสุด
ExcelRow valignBottom(this ExcelRow excelRow)
- กำหนดให้ข้อความแนวตั้งระดับแถวอยู่ล่างสุด
ExcelRange valignCenter(this ExcelRange excelRage)
- กำหนดให้ข้อความแนวตั้งระดับบริเวณอยู่กึ่งกลาง
ExcelRange valignTop(this ExcelRange excelRage)
- กำหนดให้ข้อความแนวตั้งระดับบริเวณอยู่บนสุด
ExcelRange valignBottom(this ExcelRange excelRage)
- กำหนดให้ข้อความแนวตั้งระดับบริเวณอยู่ล่างสุด
ExcelColumn valignCenter(this ExcelColumn excelColumn)
- กำหนดให้ข้อความแนวตั้งระดับคอลัมน์อยู่กึ่งกลาง
ExcelColumn valignTop(this ExcelColumn excelColumn)
- กำหนดให้ข้อความแนวตั้งระดับคอลัมน์อยู่บนสุด
ExcelColumn valignBottom(this ExcelColumn excelColumn)
- กำหนดให้ข้อความแนวตั้งระดับคอลัมน์อยู่ล่างสุด
-
Edited by Tanasit Auewongaree
Extension จัดการ Border
คือ ส่วนเสริมสำหรับกำหนดเส้นขอบ
ExcelRange border(this ExcelRange excelRange, ExcelBorderStyle borderStyle)
- กำหนดเส้นขอบให้กับบริเวณ
-
Extension จัดการ Text color
คือ ส่วนเสริมจัดการสีของข้อความ
ExcelRow textColor(this ExcelRow excelRow, string codeColor)
- กำหนดสีข้อความระดับแถว โดยใช้รหัสสีแบบ เอชทีเอ็มแอล5 (HTML5)
ExcelRow textColor(this ExcelRow excelRow, Color color)
- กำหนดสีข้อความระดับแถว โดยใช้ Class Color (System.Drawing.Color)
ExcelRow textColor(this ExcelRow excelRow, byte r, byte g, byte b)
- กำหนดสีข้อความระดับแถว โดยใช้รหัสสีแบบ การรผสมสีของแม่แบบ
ExcelRange textColor(this ExcelRange excelRange, string codeColor)
- กำหนดสีข้อความระดับบริเวณ โดยใช้รหัสสีแบบ เอชทีเอ็มแอล5 (HTML5)
ExcelRange textColor(this ExcelRange excelRange, Color color)
- กำหนดสีข้อความระดับบริเวณ โดยใช้ Class Color (System.Drawing.Color)
ExcelRange textColor(this ExcelRange excelRange, byte r, byte g, byte b)
- กำหนดสีข้อความระดับบริเวณ โดยใช้รหัสสีแบบ การรผสมสีของแม่แบบ
ExcelColumn textColor(this ExcelColumn excelColumn, string codeColor)
- กำหนดสีข้อความระดับคอลัมน์ โดยใช้รหัสสีแบบ เอชทีเอ็มแอล5 (HTML5)
ExcelColumn textColor(this ExcelColumn excelColumn, Color color)
- กำหนดสีข้อความระดับคอลัมน์ โดยใช้ Class Color (System.Drawing.Color)
ExcelColumn textColor(this ExcelColumn excelColumn, byte r, byte g, byte b)
- กำหนดสีข้อความระดับคอลัมน์ โดยใช้รหัสสีแบบ การรผสมสีของแม่แบบ
-
Extension จัดการ Background color
คือ ส่วนเสริมจัดการสีของพื้นหลัง
ExcelRow backgroundColor(this ExcelRow excelRow, string codeColor)
- กำหนดสีพื้นหลังระดับแถว โดยใช้รหัสสีแบบ เอชทีเอ็มแอล5 (HTML5)
ExcelRow backgroundColor(this ExcelRow excelRow, Color color)
- กำหนดสีพื้นหลังระดับแถว โดยใช้ Class Color (System.Drawing.Color)
ExcelRow backgroundColor(this ExcelRow excelRow, byte r, byte g, byte b)
- กำหนดสีพื้นหลังระดับแถว โดยใช้รหัสสีแบบ การรผสมสีของแม่แบบ
ExcelRange backgroundColor(this ExcelRange excelRange, string codeColor)
- กำหนดสีพื้นหลังระดับบริเวณ โดยใช้รหัสสีแบบ เอชทีเอ็มแอล5 (HTML5)
ExcelRange backgroundColor(this ExcelRange excelRange, Color color)
- กำหนดสีพื้นหลังระดับบริเวณ โดยใช้ Class Color (System.Drawing.Color)
ExcelRange backgroundColor(this ExcelRange excelRange, byte r, byte g, byte b)
- กำหนดสีพื้นหลังระดับบริเวณ โดยใช้รหัสสีแบบ การรผสมสีของแม่แบบ
ExcelColumn backgroundColor(this ExcelColumn excelColumn, string codeColor)
- กำหนดสีพื้นหลังระดับคอลัมน์ โดยใช้รหัสสีแบบ เอชทีเอ็มแอล5 (HTML5)
ExcelColumn backgroundColor(this ExcelColumn excelColumn, Color color)
- กำหนดสีพื้นหลังระดับคอลัมน์ โดยใช้ Class Color (System.Drawing.Color)
ExcelColumn backgroundColor(this ExcelColumn excelColumn, byte r, byte g, byte b)
- กำหนดสีพื้นหลังระดับคอลัมน์ โดยใช้รหัสสีแบบ การรผสมสีของแม่แบบ
-
Extension จัดการ Format
คือ ส่วนเสริมสำหรับจัดการรูปแบบค่า (Value)
ExcelRange format(this ExcelRange excelRange, string formatter)
- กำหนดรูปแบบค่า (Value) ระดับบริเวณ โดยสามารถกำหนดรูปแบบ เลข และ เวลา

Please register or sign in to comment